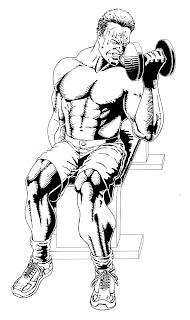
In my first post I uploaded the clean pencil version of this art and now we have the inked one ready for colouring. Comic book style inking is a very tricky craft, even if it does appear to be nothing more than tracing. It takes a lot of patience and a sure hand because the mistakes are a lot more tricky to fix up than with pencil. Being liquid, ink is also a little more tricky to control than the powdery graphite residue of a pencil. You need to be precise with it and move quickly and fluidly to avoid blots and bleeds.
In general there are 2 commonly used approaches to inking in the comic book industry. First is to ink right over the original pencil artwork and then erase the remaining graphite from the page, and the second is to do the ink on a separate overlay, which is either tracing paper or a normal sheet, in which case you need a light box to allow you to see through it. I use a 3rd option as neither of those appeal to me. I treasure my pencil art and don't want ink to ruin it should I make a mistake, and I find it painful keeping an overlay in just the right position for the several hours that it takes to complete an inking project, especially because I do my artwork in sessions in between my other responsibilities as a business owner. What I do is to scan the original pencil artwork and using Adobe Photoshop make a cyan trace template by playing with the channels. I print this "blue plate" and do my inking on that sheet. When it's done I scan that in in RGB and convert the Blue channel to greyscale which after adjusting levels leaves the clean result you see above.
Have a look at the
original pencil artwork , and the
colourised version.
 Busy polishing up the script for the first comic book and that will be up soon. (edit: It's up now, have a look!) In the mean time here is the finished "No Pain, No Gain" art that I've been building up to in the last few posts. For those interested, I use Adobe Photoshop and a mouse to do the colouring. I may do a tutorial on my method one of these days if there is an interest.


